What Actually Happens When You Save a JPEG
Saving a JPEG looks like a single step in a menu, but it is actually a five-stage pipeline: color-space conversion, chroma subsampling, a frequency transform, quantization, and entropy coding. The whole process runs in milliseconds and turns a 24 MB raw bitmap into a 400 KB file with minimal visible loss.
The sections below walk through each stage, starting with how the image handles color.
Stage 1: YCbCr Translation
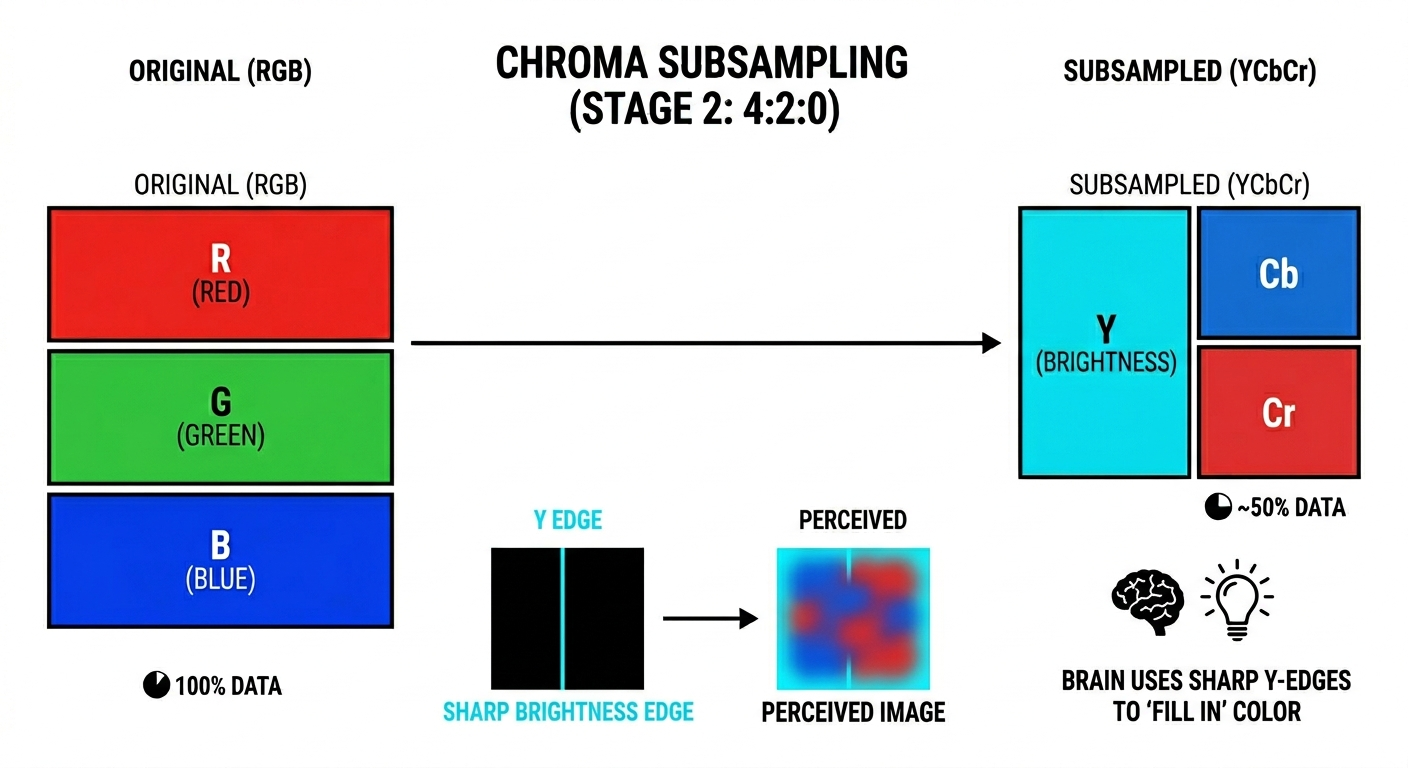
During the first stage, the JPEG process converts your image from RGB into a different color language called YCbCr. While your monitor uses Red, Green, and Blue (RGB) to display images, YCbCr splits the data into one channel for brightness, called luminance or Y, and two channels for color information, which are Cb for blue-difference and Cr for red-difference.
This conversion is a strategic move based on human biology. Human eyes are significantly more sensitive to brightness than to color. The average eye contains roughly 120 million rod cells to detect light and dark, but only about 6 million cone cells to process color. By separating these elements, the JPEG format can eventually prioritize brightness data and discard color details that the human eye likely will not miss.
Stage 2: Chroma Subsampling
Once the image is in YCbCr, the encoder performs chroma subsampling by reducing the resolution of the two color channels. The most common version of this process, known as 4:2:0, maintains full resolution for the brightness channel but cuts the color channels to one quarter of their original size. This means three quarters of the color detail is removed. Despite this loss, the human brain typically fills in color detail based on the sharp edges found in the brightness data, making the difference almost impossible to spot in side-by-side comparisons.
This stage reduces the raw pixel data by roughly 50% because the system no longer carries three full-resolution channels. Instead, it only manages one full-resolution brightness channel and two smaller color channels. While the exact impact on the final file size depends on later stages like frequency transforms and coding, this step provides the first major reduction in data.
Stage 3: Discrete Cosine Transform
During this stage, the image is divided into 8x8 pixel blocks and processed through the Discrete Cosine Transform (DCT). This mathematical operation takes the 64 pixels in a block and expresses them as a combination of 64 different visual frequencies. Low frequencies represent gradual changes like smooth skies or skin tones, while high frequencies represent sharp transitions, such as edges and textures.
To visualize this, consider how a single piano chord is actually composed of several individual notes at different frequencies. The DCT identifies the individual visual "notes" that make up the image block.
The result of this process is a grid of 64 numbers known as DCT coefficients. The top-left number represents the average brightness of the entire block, and as the grid moves right and down, each coefficient represents increasingly fine detail. At this point, the process remains lossless. Because no information has been destroyed yet, the DCT can be reversed to return the pixels to their original state.
Stage 4: Quantization
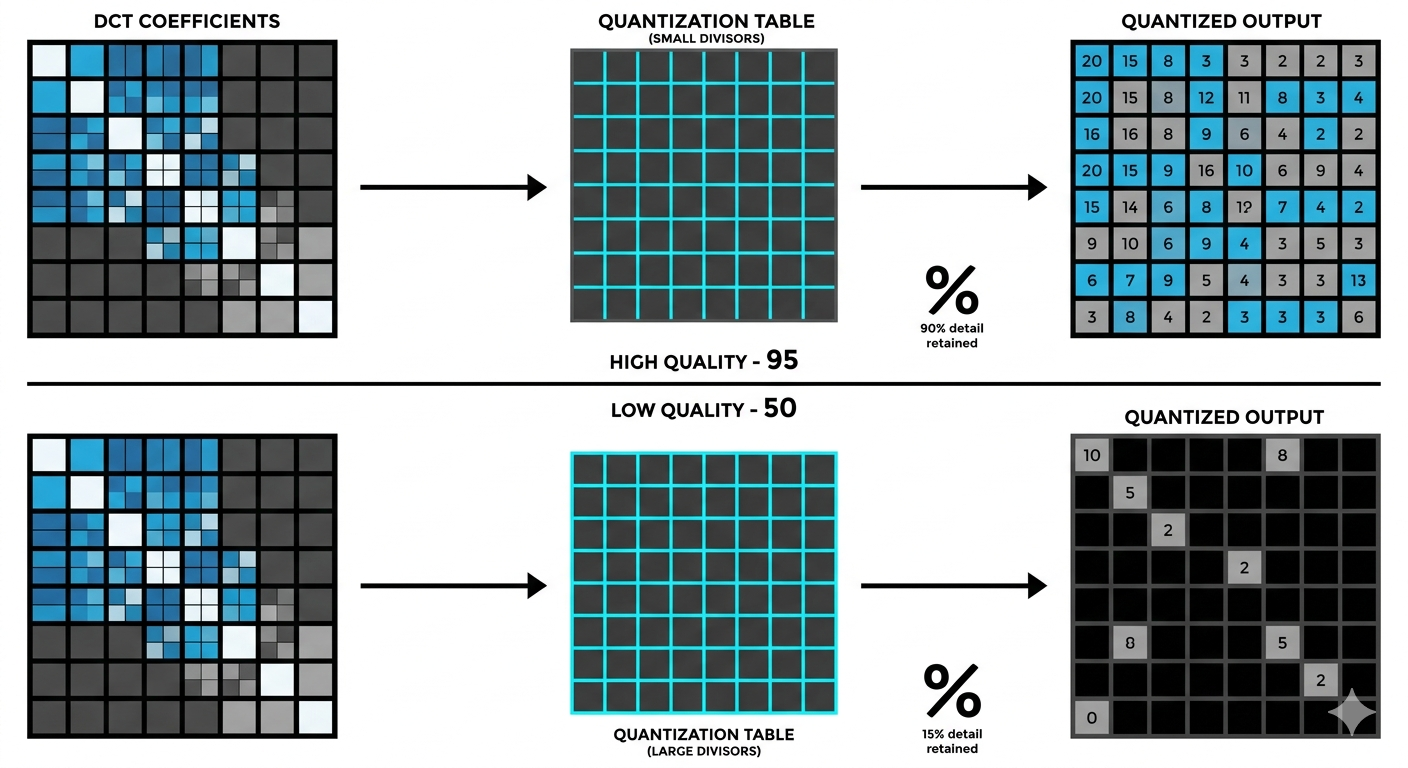
Quantization is the stage that makes JPEG a lossy format and is the part of the process controlled by the quality slider. During this step, each of the 64 DCT coefficients is divided by a specific number from a quantization table and then rounded to the nearest integer. The divisors for high-frequency coefficients are much larger than those for low-frequency ones. Consequently, when a small high-frequency value is divided by a large divisor and rounded, the result is often zero.
These zeros are essential for significant compression. A block that originally contained 64 unique numbers might now consist of only eight non-zero values followed by a long run of zeros. The intensity of this process depends on the chosen quality level. At a high quality like 95, the divisors are small, and very little detail is lost. At lower quality settings, the divisors become aggressive, causing subtle textures and fine edges to be rounded to zero and leaving only the broad gradients and average brightness of the block.
Stage 5: Entropy Coding (Huffman Encoding)
The final stage uses entropy coding, typically Huffman encoding, to perform the kind of data compression found in ZIP files. This process identifies how often specific values appear in the quantized data and assigns shorter codes to the most common ones. Because the previous quantization step created a massive amount of zeros, they become the most frequent value and receive the shortest possible code, while less common values receive longer ones. This step is completely lossless and focuses entirely on data efficiency without destroying any further information.
To make this compression more effective, the encoder reads the 8x8 block in a diagonal zig-zag pattern rather than a standard left-to-right sequence. By starting at the low-frequency corner and moving toward the high-frequency corner, the encoder groups all the zeros together at the end of the data stream. This arrangement allows the system to use run-length encoding, which simply stores a single instruction for a long sequence of zeros. While this is highly efficient, highly saturated colors can sometimes show artifacts here because they produce large values in the already reduced color channels, making any precision errors from quantization more visible to the eye.
The Generation Loss Problem
Generation loss occurs when the JPEG pipeline runs more than once on the same image. Every save repeats the colour-space transform, chroma subsampling, DCT, and quantization, and any of those steps can introduce additional small errors on top of what is already there. The losses are smaller than most people imagine when you save and re-save at the same quality with no other changes — JPEG is close to idempotent in that case and tends to stabilise after a handful of generations. The dramatic "telephone game" degradation appears when the quality factor changes between saves, the image is cropped or rotated so the 8×8 block grid shifts, or the colour profile is converted, because each of those forces the encoder to start the rounding game over against fresh boundaries.
This is why photographers and designers maintain their working files in lossless formats such as PNG, TIFF, or raw camera files, and only export to JPEG as a final step. Editing a JPEG and re-exporting it as another JPEG accumulates more loss than the same edits applied to a lossless source.
Optimizing Quality and Compression
The quality slider is not an abstract measurement of excellence; it directly controls the aggression of the quantization table. By adjusting this setting, you determine how many high-frequency coefficients are rounded to zero. For important photographs, a quality range of 85 to 92 is ideal. Dropping below 85 often reveals artifacts around sharp edges like text or fine hair, while exceeding 92 significantly increases file size for detail that the human eye generally cannot detect. Even at a setting of 100, the format is not truly lossless because the mathematical transforms and quantization still occur.
For web images where loading speed is a priority, a quality setting between 75 and 82 is sufficient for most photography. Illustrations and screenshots with sharp edges or flat colors are better suited to PNG, since the 8x8 block structure of JPEG is poorly matched to those types of visuals.
Every JPEG is a balance of color conversion, a bit of biology, and mathematical decomposition. The format is more than 30 years old, but its core trick - discarding imperceptible data to save space - still holds up well for photographic content.